
Those who have seen my video about my weather station will know I’ve been looking for at least some ability to see the current WX conditions/ I’ve also been messing with LoRa (specifically Meshtastic) a lot, so I figured I’d combine the two into one fun project! While we’re at it, I figured, let’s make it solar. Most of this can probably be done in a weekend, although it took me significantly longer. This is partially because I was developing it (I wasn’t working off plans), and partially because parts got given to me as gifts for various holidays.
Parts You’ll Need
To complete this project, you’ll need the following:
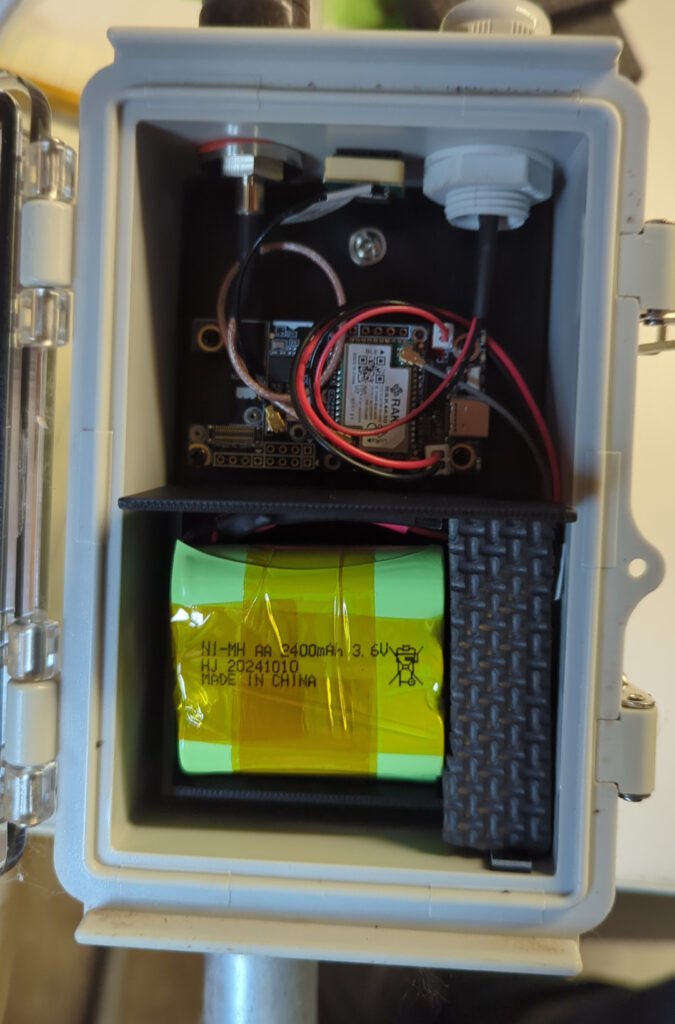
- RAK4631 LoRa module
- RAK19007 WisBlock base board
- RAK1906 Bosch Environment sensor
- RAK12501 GPS/GNSS module
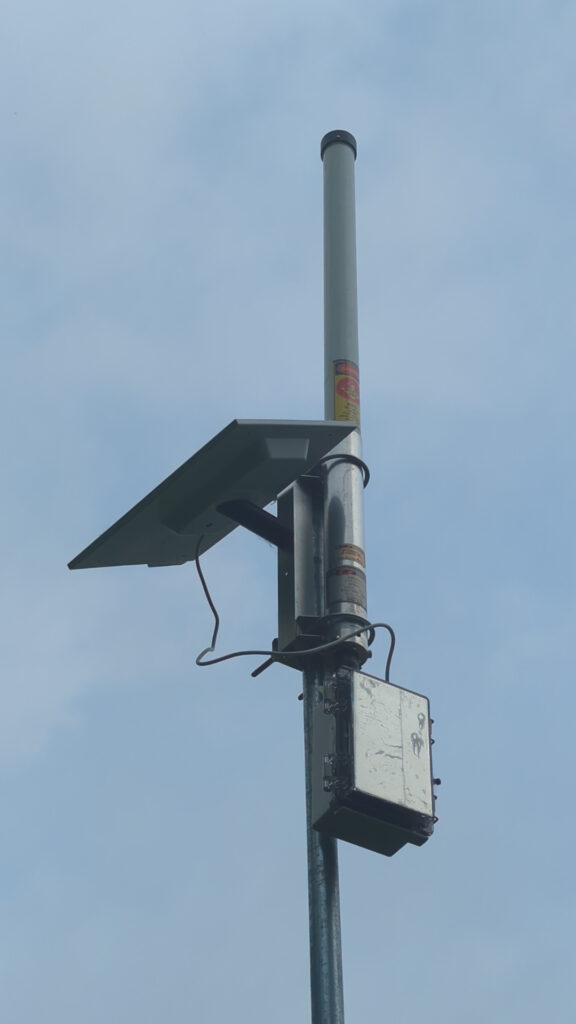
- WISCO ASP-955 3dB antenna (Thanks Andy AJ9L)
- Solar Panel (https://www.amazon.com/dp/B0CKVJ3ZFQ)
- Enclosure (https://www.amazon.com/dp/B0BP7C5JDC)
- NiMH battery (https://www.amazon.com/dp/B08B4SY2S1)
- 3D Printed enclosure backplane
- 3D printed solar panel mount
- Power/solar connectors (https://www.amazon.com/dp/B0DD57LQ16)
- Antenna Connector (https://www.amazon.com/dp/B07V5VD3TC)
- Antenna pigtail (https://www.amazon.com/dp/B08ZYK5SL9)
- Mounting Hardware (https://www.amazon.com/dp/B09D9HYB48)
Assembly
Assembly was not super difficult; I just had to drill a couple holes in the case. The hardest part was designing and building the 3D printed back panel. Once I did that, everything bolted up to it. I used a couple strategically-placed pieces of foam gym mat to keep the battery from rattling around.
Speaking of…
Note that the battery is NiMH, not Li-ion. It is also HUGE compared to the RAK19007’s power consumption. The same applies to the 10W solar panel. This was intentional. In Wisconsin, where I live, temperatures dip below zero somewhat regularly in winter, nights are long, and snow is a thing. The NiMH chemistry can survive charging at sub-zero temperatures MUCH better than Li-ion can. The size of the battery ensures at least several days of operating time without solar (e.g., if the panel were covered with snow), and the size of the solar panel ensures that the battery will charge even if part of the panel is covered.
Performance
As someone famous once said, “The best-laid plans of mice and men gang aft agley.” So how has the node performed in real life?
With one small exception, I could not be happier with the power system. It charges quickly, even in the dead of winter and it lasts a couple days on a (solar) charge. The only odd feature is that the Meshtastic firmware assumes you’re using Li-ion batteries, so the current battery percentage isn’t quite accurate. Compared to a Li-ion battery, NiMH batteries appear to discharge to 70-80% within a couple hours, but then will take days to get down to 40% or so. This has to do with the discharge curves of the different chemistries. I knew this issue when I chose to use NiMH batteries.
A couple days after I initially put the node up, I noticed it was reading ambient temperature higher than I would have expected, especially on sunny days. I ended up fixing this by covering the inside of the clear front of the case with aluminum duct tape. It still reads about 10degF high when the sun beats on it in the summer, but it’s close enough for my purposes.
My node also reports air quality. It’s a bit slow to react, because the RAK19007 is in a weatherproof case. I’ve debated different ways to solve this. Someday I may vent the case (although then I’ll need to worry about water ingress), or I could mount the environment module outside the case, using a ribbon extender cable that RAK Wireless sell.
Signal coverage is okay. I have the node mounted about 12ft in the air. I’d have much better coverage if I got it up higher. Future project. Maybe.
The reason why I say maybe is actually the last issue I’ve run into. Meshtastic does not support over-the-air (OTA, e.g., Bluetooth) firmware upgrades, so I have to pull the entire node down to update it. Also, since the enclosure is as small as it is, I have to use a special tight right-angle USB cable to update it. Mounting the node higher would make this update process even more annoying, so I may just wait on it until OTA firmware updates become possible.
Conclusion
All told, this Meshtastic solar node was a fun engineering project, a fun build, and a good learning experience! I now have slightly better mesh coverage in my neighborhood and I have a better idea of current weather conditions.
As the cool kids say, 10/10, would recommend.