
Install SDRConnect
In the VNC window into your Pi, open up a browser and go to https://www.sdrplay.com/sdrconnect/. Scroll down to the bottom of the page and download SDRConnect for Linux arm64 (arm64 is the type of processor the Raspberry Pi uses).
When it finishes downloading, go to your Downloads folder, right-click on the .run file you downloaded and select Properties. Find the Permissions tab and Allow executing file as a program.
Next, open a terminal. Type
cd ~/Downloadscd means “change directory”. Tilde is shorthand for your home folder (most likely /home/sdr/). So this command makes the terminal go into the Downloads folder. Now type
./SDRc <press the tab key>In Linux, . is the directory you’re now in. The cd command above moved us into the Downloads folder, so . is /home/sdr/Downloads. SDRc is the first four characters of the SDRconnect installer’s name. The tab key will look for any files starting with SDRc and (assuming there’s only one), auto-complete the rest of the file name for you.
If tab worked, great, press enter. If it didn’t, you’ll have to type more of the file name and see if it’ll auto-fill. If not, sorry, you’ll have to type the whole thing 🙂
The SDRConnect installer will show you a license agreement. Read it, and agree to it if you want to use the software. After that, it will ask you a couple more questions. Make sure to allow the installer to install the SDRconnect service, and, after installation is complete, do the steps to automatically start the service when the Pi boots.
Create a WiFi network
This step is an important decision point. You don’t strictly have to create the network, but, since the whole point of this project is to create a networked SDR server, you will need to create at least some sort of network connection.
Option 1: Do Nothing
As we have configured the Pi, it is already connected to your local WiFi network. You should be able to download SDRConnect on another device on your network, point it to rsp1b.local (the hostname of the Pi), it should just work. BUT…
Option 2: Create a Wired Network
Creating a separate network outside of your local WiFi has a couple of huge benefits:
- The network SDR will still work if your WiFi goes down
- You can let other people connect to your SDR without giving them your WiFi password.
The Raspberry Pi has two network interfaces built into it – the built-in WiFi and an Ethernet port. If you connect to the Internet through the built-in WiFi, you can connect to other devices through the Ethernet port.
However, there are a couple of drawbacks to using the Ethernet port for serving up the SDR:
- You can only share with one other device (if you have a crossover cable)
- OR you need to add an Ethernet switch to your SDR/Pi so it can serve more than one device.
Option 3: Create a WiFi Network
This is the option I personally prefer. The onboard WiFi on the Pi will be used as a wireless access point, so any WiFi device can SDRUnoconnect to it. This is the option I will walk through. Be aware that you’ll still need a second network (at least sometimes), so you can update the Pi. Depending on how your home network is set up, you can connect to the internet one of two ways:
- Option 3a: Remember to connect your Pi to an Ethernet switch every so often to download updates.
- Option 3b: Buy a USB WiFi dongle (make sure it’s Linux compatible! Some dongles are very difficult to get working in Linux). Depending on what you’re doing, you can use the USB WiFi dongle plugged into the Pi to connect to the Internet for updates, or as a second interface on e.g., your laptop so it can connect to the Internet AND to the SDR! This is what I do. I use a Netgear WNA3100M USB Mini WiFi dongle.
Be aware: the following steps will cause you to lose your connection to the SDR/Pi. To keep this from happening, either temporarily plug the Pi into an Ethernet port, or plug your second WiFi dongle into the Pi and connect it to your wireless network.
WiFi can be difficult to set up through the command line, and even more so on Raspberry Pis. Your best bet will be to open up a TigerVNC session and configure the Pi’s WiFi via a remote desktop connection. Enter your Pi’s username and password.
On the Panel, near the clock, look for the WiFi icon. Select it, go to Advanced Options > and Create Wireless Hotspot…
A New Hotspot dialog will pop up. Under Connection, select New… (This should be the only option unless you’ve messed with setting up a hotspot already).
I called the Network name “SDRPlay”. For WiFi security, choose WPA and WPA2 Personal (unless your device supports WPA3, then by all means, use that!). Choose a password you’re willing to share with others and click Create.
On the Panel, click on the WiFi icon again and double-check that it now shows that it’s connected to the “SDRPlay” network you set up. If all looks well, it’s time for the moment of truth –
Quit TigerVNC and connect to the SDRPlay network using your favorite method. If you’re not sure how, here’s what I’d suggest:
Plug the WiFi dongle into your computer or laptop, and use that to connect. I use Linux on my laptop, so I click the WiFi icon in the panel. It shows two lists of wireless SSIDs. You may have to plug/unplug the WiFi dongle a few times to determine which list corresponds to the dongle. Once you’ve found the correct list, connect to the SDRPlay network.
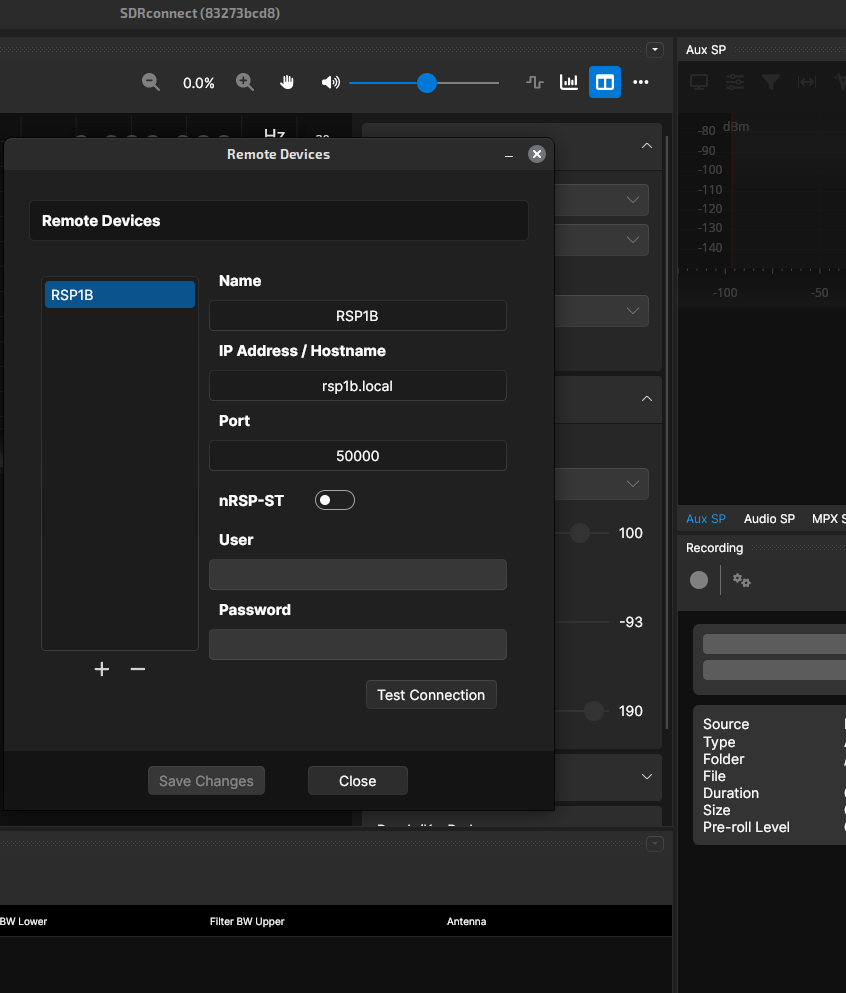
Now, open SDRConnect on your laptop. Maximize the screen. Near the top middle, there should be an ellipsis ( … ) icon. If you didn’t maximize the screen, you may not see it. Click on the … icon and select Remote Devices.
Press the + icon at the bottom of the popup window and fill in the information as shown in the above screenshot. Test Connection and make sure it works. Then Save Changes if it’s not grayed out, and Close.
The Moment of Truth
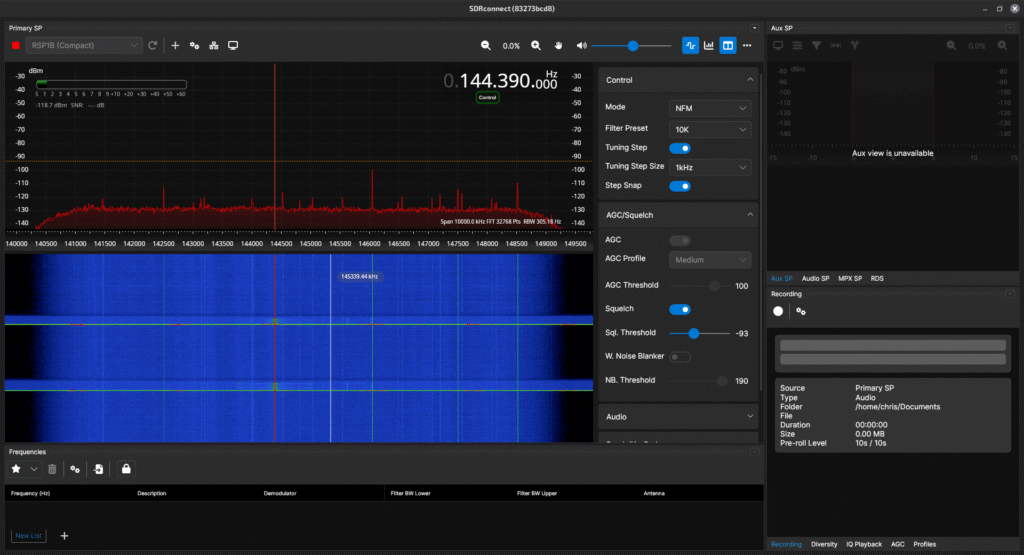
Here we go…now, at the top left of the SDRConnect window, you should see a menu that says RSP1B next to it. Jut to its left, there’s a green Play button. Press and hope.
If you did everything right, after about half a second, a spectrum display should pop up, and your SDR will start playing!
Limitations / Conclusion
Congratulations, you now have a functional remote SDR. What’s better is you made and configured it yourself!
This all being said, a small caveat: many people like to connect their SDR to an auxiliary RF output from their radio and use it to see activity on whatever entire ham band the radio is currently tuned to. This requires CAT control functionality in the SDR software. SDRPlay’s Windows-only SDRUno software has CAT control. At current writing (Late April 2025) SDRConnect v1.0.4 does not. I have talked with some of the SDRConnect developers on their Discord channel, and they say CAT control is in the works, so it’s only a matter of time. UPDATE: As of October 2025, CAT control (mostly) works in Linux!
In the next installment, we’ll look at how to do CAT control!